I have not a clue on how to change my RAM timings
![[IMG]](images/storyImages/giphy.gif)
-
-
It's pretty cool in wintertime in California these days. Average 12C-16C temps these days outside. I think it's 18C in my apartment right now.
And I apparently have a "good" BGA turd chip sample.
But there is a cancer current (amps) limit we cannot avoid.
watch, Phoenix
Try to set your taptop to these settings:
4500 mhz, 1.20v static voltage, IA AC DC loadline =0 (Auto).
It will be "stable" and not "crash", but try to run AIDA64 stress test. (Please use 100% fan speed).
Watch your taptop turn off in 10 seconds.
RAM timings guide coming next.Donald@Paladin44 likes this. -
@Papusan
Regarding your question in the rep comment.
I wake up at 4PM Take my pre-workout and fat burner and go to the Gym immediately on an empty stomach to burn FAT rather than whatever I ate in the morning.
After the Gym which finishes around 6PM, I go home, have a protein shake, and wait for my 4 pre-made body building meals to arrive at 8PM
I then consume my first meal (breakfast but at night), prepare my
![[IMG]](images/storyImages/dkhLNPB.gif) , then I start stalking you
, then I start stalking you
![[IMG]](images/storyImages/tlmRgDI.gif) until 7 AM next morning while taking little breaks to finish my meals in between
Vistar Shook, Papusan and Donald@Paladin44 like this.
until 7 AM next morning while taking little breaks to finish my meals in between
Vistar Shook, Papusan and Donald@Paladin44 like this. -
Let's not do that bro, I don't wanna waste time on that but I would appreciate the magical RAM tutorialVasudev, Papusan and Donald@Paladin44 like this.
-
You can't remember what was tested by HIDevolution? They tested several mem config if I remember correct. And different ram sticks.
And yet, you say several times you can't find my posts
Vasudev, Spartan@HIDevolution, Falkentyne and 1 other person like this. -
RAM timings guide:
1) DO not know if BGAbook running 16GB x 4 of RAM will be stable at such aggressive settings.
Please download Memtest86 https://www.memtest86.com/ version 7.5 and put it on a USB flash drive, because you don't want to destroy your operating system. Memory is not ECC, CPU will crash to protect itself. Memory will eat your operating system first and THEN Crash afterwards.
2) install memtest86 7.5 on your USB drive and prepare it.
3) Plug in USB drive and boot to Bios, set first boot device to USB flash drive.
4) first, the easist change is to change the command rate as this is the easiest to get stable first.
Go to overclock settings (OC TAB) and look for Command Rate or Nmode. It should say 2 or 2T. Change it to 1T.
If it is not there, use Bios unlock key combo and then it will be there (so will RAM multiplier but dont use that unless you want 2666 mhz at terrible timings (18/19/19/43, and 2T only).
5) Change to 1T and save and exit.
6) System will black screen for about 30 seconds, then MSI logo will appear. If appears, then good, the RAM "trained" successfully. If you get a black screen for 65 seconds and the power LED light turns off and on, it was a RAM timing fail and it reverted to defaults. Try 1 more time first, before giving up. This happens sometimes. But after 2 fails it means it is FAIL and going to FAIL no matter what.
7) it will boot to the USB flash drive, but will take 2-3 minutes to boot to UEFI Memtest86. Looks like it's crashed but it's not. It just takes this long. Then memtest86 will start. Let it do at up to the "Hammer" test (test 11). This test 11 takes over 45 minutes---I always SKIP IT. Because if it made it THIS FAR WITHOUT ERRORS, windows is probably stable.
8) If no errors in memtest 86 up to test #10, you can press ESC, change boot to SSD drive and boot to windows.
or you can try for more:
9) if 1T is stable and you want more,
You can try CAS 15, TRAS and TRD or that other setting (first 3 settings): 15/15/35. (this will show as 15/15/15/35 1T, in windows).
You must wait for RAM training again, and this time I suggest letting MEMTEST86 finish fully.
10) Don't bother with TREFI and tRFC. I don't think that will be stable with 64 GB.Vasudev, Spartan@HIDevolution and Donald@Paladin44 like this. -
Phoenix ram.
(17-17-17-39) 64GB DDR4 RAM
I would learn to walk before I try to run. 15/15/15 1T is a heavy goal for his big ram package.
If you want faster ram testing TestMem5Last edited: Mar 5, 2018Vasudev, Falkentyne and Donald@Paladin44 like this. -
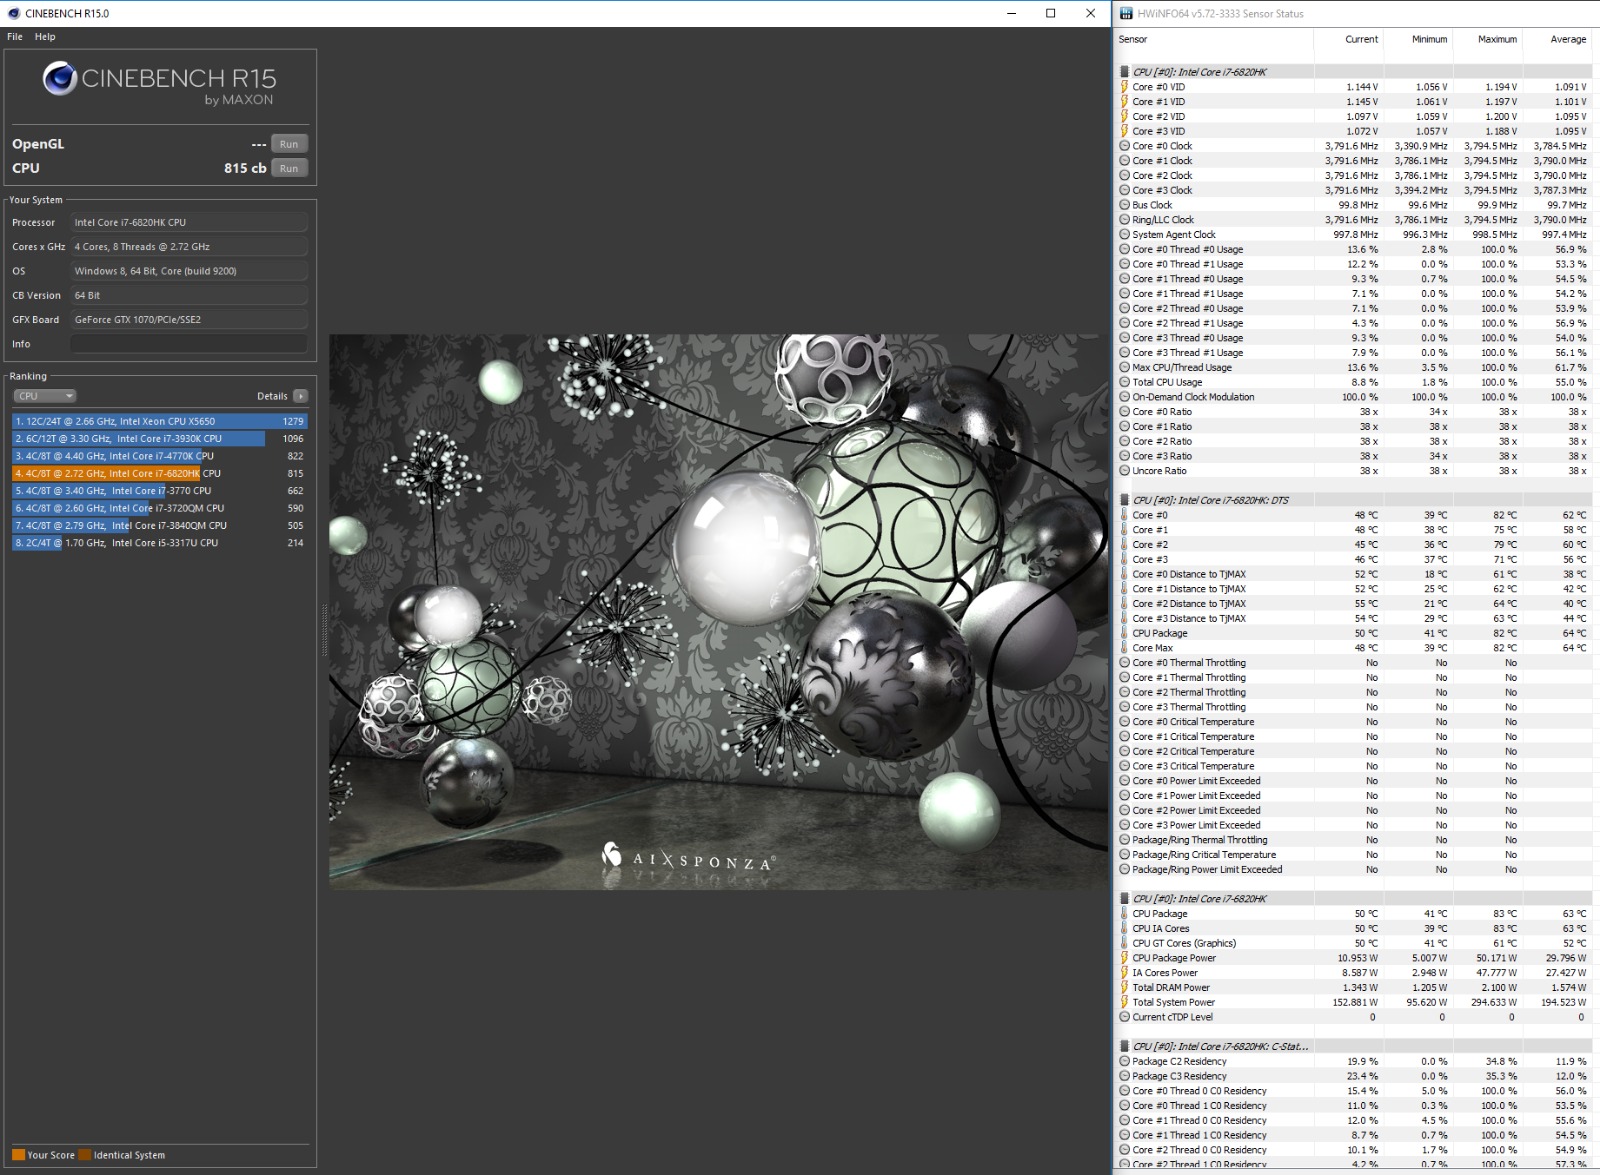
While Phoenix is working on that here is AVX disabled prime95 at 4700 mhz, 1.272v, IA AC DC=1, max fan speed. 100W.
![[IMG]](images/storyImages/0WD6pTM.gif)
Vasudev and Donald@Paladin44 like this. -
4800 mhz, 1.310v, IA AC DC loadline=1
Cinebench 3 runs
@Papusan the power draw is too high for 4800mhz and 1.310v isn't it.......?
@Mr. Fox is BGA really this bad?
What does 7700K do at 4.8 ghz and 1.310v ?
Vasudev and Donald@Paladin44 like this. -
First test was with 1T, I passed mem test successfully. Tried cinebench but got 1 point less. 1011
then I ran it again, the score went down to 1004
so I closed Cinebench and reopened it, after running the test the score went down to 977
I'll use the taptop for a while now to see if it's stable before going to the next step.
thanks a lot for this detailed guide man.
I don't have any money to rep you. @Vasudev help me man
Vistar Shook, Vasudev, Papusan and 1 other person like this. -
Cinebench doesn't seem to be affected by memory timings very much.
Best way to run cinebench is to set "PROCESS PRIORITY" to REALTIME in windows task manager for the executable.
Then run it. It will look like it froze, but will finish and your score wiill be 5-10 points higher.
However I did get consistently 4 to 5 more points when going from 17-17-17-39 2T to 15/15/15/35, 1T.
Papusan was correct I think.
Your problem with scores are startup programs you are running.
I don't have anything loaded at startup except basic windows services, Synaptics driver, Yolomouse (yes, yolomouse), Nvidia display drivers and "Silent Option".
Could be anything. Only Papusan can help with that. Try setting "realtime" priority to see if that helps.
BTW I posted 4800 mhz cinebench scores. It's stable, but the temps get too hot. This is my limit to being fully game stable. Was able to run stockfish chess engine 8 threads also but that uses less power than cinebench.
I can run cinebench at 4.9 ghz at 1.37v, but temps get to 95C after a couple of runs and that's with max fan speed. Over 115W power draw. Not safe to use besides suicide bench runs. Laptop's probably close to power tripping itself ....Vistar Shook, Vasudev and Donald@Paladin44 like this. -
Not for 1.310v I think (Lower clocks doesn't mean very much for decrease the power draw). Test 49x with same voltage. You don't need to run the full test.
You have Autoruns.exe on your machine. Use it. As well put "PROCESS PRIORITY" to REALTIME in windows task manager as mentioned above. From over 1000 down to 977 doesn't seems right.
Vistar Shook, Vasudev and Donald@Paladin44 like this. -
x49 crashes instantly at 1.310v. I need 1.375v .....
Vasudev and Donald@Paladin44 like this. -
Have you the knowledge also of what I have in my fridge?
Falkentyne, Vasudev, Papusan and 1 other person like this.
-
I know everything about you, bruh
This is from my fridge. But not a record for 48x
Maybe try something in the middle. The above is 1.225v load voltage (Not optimized for 48x). A random voltage
Vasudev, Spartan@HIDevolution and Donald@Paladin44 like this. -
@Papusan
4900 mhz 1.375v
IA AC DC=1
3 runs cinebench.
Can't go more. temps are too high. look.
Donald@Paladin44 and Papusan like this. -
I fixed this for you
 With
@Vasudev he will get double
With
@Vasudev he will get double

I wait for @Phoenix run This is record for you. I mean you had 1083 or was it 1085 before. I wonder how Danishblunt managed 5.1 or was it 5.2GHz stable with 1.270v on same Msibook
Or was it with an
Alienware?
Last edited: Mar 5, 2018Spartan@HIDevolution, Vasudev, Falkentyne and 1 other person like this. -
"MSIbook GT73VR with custom homemade EC". Because MSI clearly gave him the SHA-1/SHA-256 encryption key to hack the EC Without a permanent brick, right? And you can't hack the EC without disassembly in Linux....
7820HK CPU may be able to load windows at 5 ghz at "1.270v" with the "Default" IA AC DC Loadline setting (you will black screen if you set this to "1" at this speed and voltage), but he doesn't know that's not the real voltage. No one knew what the IA AC DC loadline setting did (except Raja and some Asus people from their forums). If we assume 100 amps, then 1.270v + (0.0018 * 100) = 1.45v, and if 80 amps, 1.270v + (0.0018 * 80)=1.414, but amps goes up with current so it has to be higher than 80. So lets say he loaded windows at 5 ghz (which I did also)? 1.270v + 1.80 mOhms of resistance from default IA AC DC loadline setting would be up to 1.45v at full load. And less at idle since voltage (VID) goes up as current goes up...would you even get into windows without BSOD first?
1.40v can load windows at 5 ghz but you can't run anything besides super Pi 1M. 1.45v is impossible at 5.2 ghz. 5.1 ghz @1.45v might be good for a suicide CPU-Z run. Without liquid metal, impossible because of temps. With liquid metal, the laptop would just shut off if you put a heavy load on it because of hardcoded amps limit. And if amps limit didn't get you first, 100C temps would. Quickly.
If he had claimed he used liquid metal, then there was hope for a suicide run. But he doesn't use LM and claimed he made his own EC to allow 5.2 ghz at 1.270v, which is impossible. Especially since he doesnt know how the IA AC DC loadline setting works! So 1.45v without LM? Yeah right.
Even Mr Fox's 16L13 shut down at 5.1 ghz when Prema removed the 91W power limit restriction (7700K TDP) and when a full combined load was put on the CPU and GPU, the laptop just shut down.Last edited: Mar 5, 2018Spartan@HIDevolution, Vistar Shook, Kevin@GenTechPC and 3 others like this. -
Doesn't XMP profile work on your modded unlocked BIOS? You did unlock Memort training Alg. too in BIOS, maybe try it.
I know exactly what do have. Your fav food you always ask me, right? OR Liquid Nitrogen for extreme OC'ing MSI and Macbook Air?Vistar Shook likes this. -
Just change to custom settings, leave all of the timings alone and change the clock to 100 and ratio to 14 and that will be 2800. That works fine for my Kingston HyperX Impact. If the setting is available, also set tREFI to 65535 and it might make memory training easier for the BIOS.
Actually, that's not too bad. In fact, I would say it is about right. With my 7700K at 48x4 and ring at 44x with 1.200V the Cinebench R15 score is identical to yours. CPU drawing 92W. I have an average 7700K in the DM-G. The one that I had in the DM3 was binned a lot better.
Edit: my temps are about the same as yours, too. Voltage setting in the BIOS is 1.200V.
 Last edited: Mar 6, 2018Papusan, Vasudev, Kevin@GenTechPC and 3 others like this.
 -
On the 4th run with 48x and finally passed 1080cb and new record for that clockspeed. 7 points below your 49x score, bruh You like it? LGA -
FTW
@Phoenix
![[IMG]](images/storyImages/tCUzkRI.png)
Current Cinebench R15 numbers from Papusan's LGA Camp.
42x - 954cb
43x - 976cb
44x - 999cb
45x - 1019cb
46x - 1040cb vs. @Phoenix's BGA + Steelseries Keyboard push 46x...![[IMG]](images/storyImages/TitkkWK.gif)
47x - 1064cb
48x - 1084cb
49x - 1104cb
50x - 1120cb
51x - 1138cb
For the records... From Alienware camp... TRIPOD and 4.3/4.4GHz
Last edited: Apr 19, 2018Vistar Shook, Ashtrix, Mr. Fox and 4 others like this. -
New record for 47x in Cinebench R15 - 1064cb
![[IMG]](images/storyImages/OcTNhnK.png) Last edited: Mar 9, 2018Vistar Shook, Kevin@GenTechPC, Ashtrix and 4 others like this.
Last edited: Mar 9, 2018Vistar Shook, Kevin@GenTechPC, Ashtrix and 4 others like this. -
Hello,
What are the safest and most stable settings for humble 4200mhz? Got bored by the default 4100... Thanks.
Also, wouldn't the dragon center stand on the way of BIOS settings?hmscott likes this. -
Hello my friend
The latest Dragon Center now limits you to 4.1 GHz whereas the older versions allowed 4.2 GHz. Either way, you wanna get rid of it completely because it keeps messing with the VR Current Limit setting it back to Auto which causes CPU Throttling under load.
Here are the safe settings for a 4.2 GHz overclock
CPU Multiplier / Max OC Ratio = 42X
CPU Voltage = Adaptive
Ring (ie. CPU Cache Frequency) = 42X (although there is a limit in MSI BIOS where the CPU Cache will always run 300MHz slower than the fastest core. Still, just set it to 42X
Voltage Offset = -100mV
VR Current Limit = 400 (100A), because in the BIOS, the value is divided by 4 so setting it to 400 means it shows up as 100A in Intel XTU, it's called Processor ICC/Cache Max in XTU
Turbo Power Max and Short Power Max = 200Vasudev, hmscott, Vistar Shook and 1 other person like this. -
Is that a skylake or kabylake? Assuming it's Kaby, otherwise you wouldn't be getting to 4.1 ghz "easily" on a 6820HK. For most, they top out at 4.2 ghz, and 4.3 ghz without an obscene amount of voltage would REQUIRE the unlocked Bios, or you would either be BSOD'ing all day and night, or the laptop just shutting off at heavy load.
After you do what Phoenix says, make sure you don't have "EDP OTHER" in Limit Reasons, in Throttlestop (in red) during your stress test, or "Current Limit (VR)" throttling in HWinfo64. Some people, after uninstalling Dragon Center, were throttling anyway, even when VR Current Limit (ICCMAX) in bios was set to 800 (200 amps). They even tried "loading Setup Defaults", doing it again and it was STILL throttling.
I had to tell to *WIPE* the entire CMOS data and start over from the beginning--only thing that fixed that cancer. Dragon Center had apparently written an "invalid" value to the Bios register and corrupted it, preventing any overrides from working.
To wipe the CMOS, turn off the laptop. Hold down the power button and do not release it. The laptop will turn on, then turn off, Keep the power button held down for 45 seconds, then release it. Then wait 60 seconds for the power LED to "boot cycle", then wait another 60 seconds for the MSI logo to boot loop several times, until it's satisfied and you're in windows.
From there, you will have to go back in the Bios and set all your stuff again. Then you're golden.Vasudev, hmscott and Vistar Shook like this. -
Thanks, it doesn't seem to throttle with the above settings, but the notebook gets extremely loud during gameplay... Phoenix, could you also post safe settings for 4100 and 4000? I noticed that the notebook is more responsive without the Dragon Canter even at 3900 compared to 4100 with Dragon Center.
Vasudev and Donald@Paladin44 like this. -
Don't use MSI cancer software. The only good MSI branded software that should be installed is 1) SCM (required), 2) Silent Option (lets you control fan curves, WITHOUT messing up your overclock).
Kevin@GenTechPC, Spartan@HIDevolution, Vasudev and 1 other person like this. -
Well, anything above 3900 gets thermally throttled with Voltage Offset = -100mV and VR Current Limit = 400 (100A). Can I use lower values for 4000 and less heat?
-
To get someone's attention, either quote the post to which you are replying, or put the @ with no space before their name... like @Falkentyne, and they will be sent an alert that you are talking to, or about them.Papusan, Vasudev and Vistar Shook like this.
-
You still have yet to answer my question. I asked if you have a skylake or kaby lake. 6820Hk or 7820HK. That's important.
can you please download AIDA64 trial version, and do a 5 minute "System stability test", and then post the screenshot, with "HWinfo64" running in the background please? Make sure the CPU VID, CPU temps, and the CPU "package power" (watts) is shown in the window. Thank you.Kevin@GenTechPC, Vasudev and Donald@Paladin44 like this. -
He talk about default 4100. I'm quite sure Msi offered the predecessor [email protected] And I don't even have a Msibook, bruh
Donald@Paladin44, Vistar Shook and Vasudev like this.
-
That's the 7820HK, since this thread is about MSI GT73VR 7RF Titan Pro, I thought it went without saying, that I had the same notebook as the OP, and, Papusan mentioned it correctly that the default 4.1Ghz corresponds to the '17 model. Sorry, I wasn't clear enough.
Donald@Paladin44 likes this.
-
Anyone tried manual voltage for different MHz speeds?
Donald@Paladin44 likes this. -
Manual voltage will not work properly without an unlocked Bios.
Setting 1.17v manual voltage will pour about 1.3v (this will be about the maximum, based approximately on 80 amps), depending on load, into that poor CPU at heavy load (the less load, the less voltage boost).
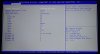
First: here is what happens if you set 1.145v at 4500 mhz with MSI's auto settings you have no access to.
Notice that the full idle VID is showing up as 1.243v, while the load VID is showing up as 1.184v. This is completely inaccurate. In fact the idle VID is probably close to 1.184v but the full load VID is close to 1.270v. This will become obvious when you see the third picture.
THESE PICTURES ARE PRIME95 WITH AVX DISABLED ( CPUSupportsAVX=0 and CPUSupportsFMA3=0 in local.txt. If AVX were enabled in either test 1 or 3, the laptop would instantly turn off at start of prime95.
1) 1.145v, 4500 mhz, IA AC DC loadline=MSI Auto settings (Intel reference value=2.10 mOhms).
Please compare the temps from picture 1 with picture 3 for a wow factor.
2) 1.178v, 4500 mhz, IA AC DC loadline=1 (0.01 mOhms) set with unlocked Bios.
3) 4700 mhz, 1.275v, IA AC DC loadline=1 (0.01 mOhms). note: the 12k test had just finished. I did a hwinfo window move fail. So same prime settiings.
Notice that the temps with higher set vcore and higher mhz is the same as picture 1? That should have you scratching your head big time.
Yeah.
Even Phoenix is scratching his head at that one.
And @Papusan is vomiting mad at cancer firmwares
Temps in test 1, with 1.145v at 4500 mhz, with MSI default IA AC DC loadline (2.10 mOhms), are IDENTICAL to test 3, with 1.275v, at 4700 mhz, with IA AC DC loadline=1 (0.01 mOhms).
And since frequency also increases current, it's very obvious that the "true" voltages (which we cannot see because there is NO live VCORE SENSOR ON THESE LAPTOPS, only some Clevos have VCORE sensors. VID is NOT live VCORE!!) at 4500 mhz picture#1 *had* to be at least slightly higher than the true vcore in picture#3, to get same temps but compensate for the mhz difference.
If you don't have the unlocked Bios, and want to use static voltages, you have to deal with strange voltage boosting like that, and the higher the amps, the more the VID boost, so you have no idea what your poor cpu is getting.
Svet on the official MSI forums can unlock your bios for a donation (usually $20 Eur) or you can take the risk and read paloseco's guide in the main MSI section and try to unlock it yourself so you can access that setting.Last edited: Mar 22, 2018Donald@Paladin44 and Vistar Shook like this. -
Yeah, I see. I was going to ask about Prime95 settings, but you beat me. My findings show that with 400vr limit and 100 voltage offset the thermal throttling occurs even at 3800mhz during gameplay in Vermintide2. This game is CPU heavy, and shows well the limitations of the notebook cooling limitations. The TIM is gelid extreme. Actually, I haven't tried monitoring the default CPU setting, maybe the throttling occurs even at default voltages at 3900mhz.
Also, how much something like this ( http://www.coolermaster.com/cooling/notepal-series/notepal-xl/) might help with temps? Are these things a gimmick or might actually shove off 2-5 degrees?Vasudev, Donald@Paladin44 and Falkentyne like this. -
You should not be thermal throttling on this at all.
100 voltage offset?
is that NEGATIVE or POSITIVE?
May I ask you where and what program/utility you entered this voltage offset at?
Is there any chance you can post a screenshot?
Download Cinebench R15, and HWinfo64 please. Install both.
cinebench:
https://www.maxon.net/en/products/cinebench/
HWinfo64:
https://www.hwinfo.com/download.php
Do 3 CPU loops of cinebench R15 consecutively, without pausing the test.
Post the screenshot after the last test, with the HWinfo64 window showing also.
Make sure CPU VID, temps, package power (Watts) are all visible.
If it's not too much trouble, if you can have the second and third HWInfo windows visible as well (basically, when you scroll down in HWinfo (there is a way to do this)) that has the power limit and voltage/thermal limit flag with yes and no, showing, that would also help a little.Vasudev, Donald@Paladin44 and Vistar Shook like this. -
The offset was entered in BIOS, it is positive, I suppose.
I should not be throttling at all you mean on the CM stand or with the current settings?Vasudev, Donald@Paladin44 and Falkentyne like this. -
The offset in Bios is ALWAYS positive!
To enter a NEGATIVE offset in Bios, you need to go to the "Overclocking Performance Menu" which you have no access to right now.
Can you please take those screenshots for me with those 2 programs i asked about ? I want to see just how much you were torturing that poor CPU with that +100mv offset
I need to see this because I need to see your CPU's default VID. (which I can see just by subtracting -100mv from your offset and THEN trying to use voodoo magic to compensate for the IA AC DC 2.10 mOhms VID boost (translation: good luck).Vasudev and Donald@Paladin44 like this. -
Okay, I will. So I suppose I need to reset the +100mv offset back to 0 in the bios?
Vasudev, Donald@Paladin44 and Falkentyne like this. -
No, do the tests first that I mentioned. then after you take those screenshots, then set it back to 0.
Donald@Paladin44 likes this. -
I don't really think that I need to do that if the positive offset overvolts the CPU?
Donald@Paladin44 and Falkentyne like this. -
Your choice. But you really shouldn't be reaching Prochot in vermintide. I wanted to see the VID and core temps since you already did reach it before.
Ok you win.
Remove the undervolt back to 0, download Cinebench and hwinfo, and do 3 loops then post screenshots.
That fair?Donald@Paladin44 likes this. -
That's what I'm doing right now.
The Vermentide btw is tweaked to load all the 8 threads. With 6 or even less threads, it is surely less stressful.Donald@Paladin44 likes this. -
the hwinfo64 was always in the background during the vermentide overheating runs.
Vasudev and Donald@Paladin44 like this. -
Thank you for this post. VERY useful.
You indeed have core temp differential problem. this is the same problem that Genocid and ivan994 had. @Ivan994 was able to permanently fix his high temps (he is VERY VERY happy now), by a combination of using 0.5mm Arctic thermal pads on the CPU VRMs (small black square IC's) and CPU chokes (larger grey square IC's), and SANDING the heatsink down to perfect flatness.
You have the same issue many others have, with core #0 (first core) and core #2 (third core) having much higher temps than core #1 and core #3 (the second and fourth cores).
Can we move this discussion to PM or the main GT73VR thread? because this is basically thread crapping at this point.
But the 2 hotter cores are the cores closest to the VRM's. The core temp differentials exist because there is HIGHER heatsink pressure on the COOLER CORES (obvious, right? more pressure=lower temps!) and less pressure on the hotter cores. This is "exasperated" or made worse, by the 1.0mm thermal pads rather than aftermarket 0.5mm arctic pads. here is a picture for reference (if you were looking at this CPU in a GT73VR, the VRM area would be "north" (top) above the CPU.
Vasudev, Kevin@GenTechPC, Spartan@HIDevolution and 2 others like this. -
@Falkentyne
I have the exact same problem Gt73vr and repaste x time with out help. Thanks you for your Post. I will change the pads too 0.5 mm and post the Temps here. Big big thxVasudev and Vistar Shook like this. -
Gt73 VR
3 Loops in cinebench
-100mv Offset 4x3.8 ghz chache 3.8 ghz Ram DDR2400
It was repastet 3 weeks ago with grizzly kryonaut. Graka Temps are perfect... cpu ****..
Core 0 and 2 are the hot one .. exatly like on the photos.Attached Files:
Falkentyne likes this. -
-
Only 55 watts of power and 82C (11C total temp delta). yeah. My advice to you: do what's easy first.
Buy 0.5mm arctic thermal pads, and remove the existing 1mm pads and replace with 0.5mm.
Then clean the old compound off completely and fully, and repaste with Coolermaster Gel Maker Nano.
Make sure you spread it evenly and completely across the BGA housing. don't just use a small dot or even an x shape, do a full coating
https://www.amazon.com/gp/product/B00UYTTLI4/ref=oh_aui_detailpage_o03_s00?ie=UTF8&psc=1
https://www.amazon.com/gp/product/B019BZENY8/ref=oh_aui_detailpage_o03_s00?ie=UTF8&psc=1
Always UNPLUG the ac adapter AND Battery cable connector before repasting. ALWAYS.Bullzz likes this.
MSI GT73VR 7RF Titan Pro-425 Review By Ultra Male
Discussion in 'MSI Reviews & Owners' Lounges' started by Spartan@HIDevolution, Feb 9, 2017.


![[IMG]](images/storyImages/UIGaMs9.jpg)
![[IMG]](images/storyImages/vOo8rQw.jpg)