
Hi Dave,
I found the Hybrid Power utility confusing as well.
I think all you need to do is have it running, and it changes to Hybrid Power when needed (when GPU is being utilised)
If you run a benchmark, and then return to the hybrid power utility, the top 'Hybrid Power' chart will show you when it turned on.
-
-
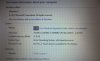
Here's my CrystalDiskMark results as requested:
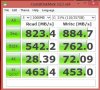
Overall the results aren't bad but I was seeing slightly better performance earlier in the week.
Not sure why the scores are lower now, but maybe the Samsung magician software that I installed when I installed the 840 Pro has something to do with it?
Actual real-world performance doesn't seem any different mind you.
Oh, and the 32GB of HyperX CL9 arrived today (that was quick!).
I was going to wait for the Intel wireless AC adapter to arrive before installing them, but it's a long weekend here ( HAPPY BIRTHDAY CANADA!), so I might just go ahead and drop them in now - probably re-do the thermal paste on the CPU/GPU too.
(Might as well if I'm going to have the thing torn apart anyway). -
Thanks jamiee!
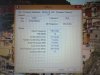
Yes, benchmark performance scores will vary somewhat, so not to worry, and some benchmarks are better in some areas of testing, than others. This is why I wanted a 5-run test with CDM..... for an overall CDM average. As I am sure you've noticed, the X100's are nice performers, and really no need to upgrade, unless one has the money and they simply want to increase capacity. To that end, I am happy with the Plextor M5M's. On a side note, my Plextor's arrived with firmware version 1.02, and version 1.03 was recently released. I am happy to report the M5M's are firmware upgradable (as are the X100's), and this was simple and went without a hitch. Have you checked your X100 firmware version?
Anyhow, I think PC Mark provides a good 'over-all' SSD benchmark, and I look forward to making this comparison with PC Mark 8..... soon to be released!")
Much success with your upgrades!
-
Oh yeah I certainly expect some variation in the test results - It's just that the variation was a little more than I was expecting
My X100's have firmware version 10.04.00 on them, which is the latest according to SanDisk.
Oddly enough SanDisk's own "ssdtoolkit" software doesn't even see the drives, so theirs no way to actually update the firmware through it. -
To see your SSD firmware version, use Intel's IRST, click the 'Help' tab, then the 'System Info' tab. If the firmware is an ISO, probably no need to use their tool-kit for flashing..... just create a DVD or USB bootable-disk with the ISO, and boot directly to the flash program...... but of course, double-check SanDisk's recommendations.
-
Yup, that's exactly how I got the firmware of my mSATA's :thumbsup:
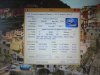
Interesting.... I just re-ran CDM.
The sequential read and writes are now in-line with what I was expecting to see.

-
LOL! I am not going to get into 'Benchmark Wars', so I am using the first 5-run's you posted. We could do that for days, don't ya know?
I already have a comparison with HD Tune, but are you going to get PC Mark 8? Hope so, because later I'll be posting these (and other benchmarks) to the thread's #2 post.
-
Did you install the Windows 8.1 Preview?
There's no WEI in W8.1.
I'm concerned about Windows 8.1 Preview Drive Optimization with bios set to Raid defragging SSDs.
If you're using 8.1 and bios set to raid how does your SSDs show up in Control Panel>Admin Tools>Optimize Drives? -
No, I have not installed the 8.1 Preview, and decided to wait for the Final release. Anyhow, WIN 8 now identifies the storage device in WINSAT, so 'optimizing your drive' (SSD's) in WIN 8, is now a good thing. With proper SSD recognition, rather than defragging, the OS now 'TRIM's the SSD's. Currently, I have 'Optimize Drives' scheduled 'Weekly' for my RAID set (C: ), and I suspect it everything will function the same in WIN 8.1.
-
In Windows 8.1 Preview with the bios set to raid SSDs are not recognized as Solid State Drives in Disk Optimizer.
Running the Optimizer will defrag SSDs.
From an Administrator Command Prompt run the Command
WinSAT diskformal
It's a manual running of the missing WEI
After running the command SSDs will appear as Solid State Drives and not be defragmented when optimized. -
I noticed on Nvidia Dragon Edition 2 driver page, it lists Nvidia N14X Series Graphic Card drivers. What the heck is that? Is that the currently available driver for GTX780M? I understand that Nvidia's current beta driver (320.49) does not install for gtx780M. My whitebook will arrive soon... Am I SOL? What driver is everyone else here using, when doing a fresh install?
-
the N14X driver is the right one to install. When you install it, it will actually show up as Nvidia driver 311.48 in the Nvidia Control panel. This is the one to use until a new driver comes out.
-
Thank you very much for that clarification! Relieved...
-
You are having fun with the Preview, aren't you?
Like I said, I decided against the Preview, and I am quite content waiting on Final. Again, I suspect this will be ironed out by then.
-
On the driver issue, it appears we have a weird 780M identifier that has alphanumerics in the subsys versus all the other 780M versions that are just numbers. DEV_119F&SUBSYS_10EA1462 "NVIDIA GeForce GTX 780M". It doesn't appear in any of the drivers on nVidia's site. In the MSI furnished 311.48, it's listed in "nvmi.inf", but nowhere else.
I modded both the "list devices.txt" and "nvcvn.inf" with all the appropriate info for this card (%NVIDIA_DEV.119F.10EA.1462% = Section083, PCI\VEN_10DE&DEV_119F&SUBSYS_10EA1462, like 6 places in nvcvn) and tried to install 320.49, 320.18, and 314.22. All allowed me to start the install but then failed. 320.49 got far enough once to make the screen flicker like crazy and crash to the lock screen. I had to boot in safe mode and uninstall it and 311.48 and then reinstall 311.48. The other install attempts all failed quickly and didn't corrupt 311.48 (too much at least). Also, I did try to install all 3 with 311.48 uninstalled and ccleaner on the reg, but that didn't work either.
In addition, when on nVidia's site and doing the auto-search, it said that my notebook manufacturer required I use their approved drivers.
So, I guess my question is, has MSI done something with these notebooks that make it so we can only use the drivers they do something to and then post on their site? If so, I don't think I'm going to be a happy camper and might even return this while I still can. Or is this just an issue with nVidia being slow and MSI did a work around but only on the 311.48 and nVidia updates will eventually work?
Hope my experience helps a bit and thanks in advance for replies. -
The other problem with 8.1 beta preview is that you can't install the final version over it.
- Think I'll be waiting for the final release as well. -
Thank you for the detailed info. I won't have my laptop until Tuesday, so there is nothing I can do to assist in testing... Have you tried this? --> v320.20 Windows 8 64bit | NVIDIA Mobile OEM - 32x Series GeForce Driver release - LaptopVideo2Go Forums
-
Also try this 326 whql. Windows 8.1 preview drivers. Supposedly, it install on win 7. Therefore, I don't see why it wouldn't also work on win 8. If anyone is willing to try, I'd appreciate some feedback. Thanks!
Edit: nevermind, it doesn't list 780M as supported card... -
Why is that a problem?
An RTM and GA version should be clean installed.
Operating System upgrades are usually not recommended.Clean installs are the way to go to avoid a lot of issues. -
It's not really a problem so much as a warning to those thinking of installing it.
If you're willing to test 8.1 beta then do a clean install when the final is released, then I say go for it
I'm fairly happy with Windows 8 as is, so I'm OK with waiting till 8.1 final is released. -
My feelings precisely...... it didn't take a lot of reading on the topic to discourage me. Some are even recommending the Preview be installed on a separate partition. It's a little too much fuss, I don't have the time, and I have no problem waiting on the Final.
As to those fussing over the NVidia drivers....... patience, please. There is nothing nefarious going on here, and it's par for the course. Every time a hot new GPU is released, NVidia is playing 'catch-up' getting it incorporated into their Verde Driver Program..... and this usually takes a month or so. As of late, we saw this with the 580M, the 680M, and so it goes for the 780M. It is also not surprising or unusual, to see HW ID's missing from new betas. In spite of the fact NVidia's website shows 780M support in this new beta, the Release Notes (320.49) do not...... scroll down to, 'Supported NVIDIA Notebook Products'. Anyhow, again, none of this is surprising, but I expect to see full 780M support in their next 'Final' driver release...... SOON!
-
I sure hope so! (Regarding the drivers)
-
How soon do you think
-
i will buy the GT70-2OD soon but i worry about the temperature , my room temperature is 31c/32c ( SE Asia ).....
Now i using MSI GX 640 with facing overheat before but i fix it by notebook cooler , repaste thermal compound , remove dust from the fan and force the fan run in 100% .
Is that GT70-2OD safe/worth to buy compare to the Sager P177SM-P170SM ? -
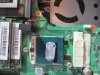
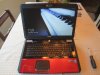
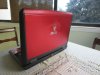
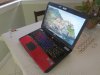
A GUIDE FOR REPLACING MEMORY & RE-THERMAL PASTING THE GT70 2OD
This guide serves as a general instructional set for how to change the thermal paste
on both your CPU and GPU, as well as swap out the stock SODIMM memory modules for some faster RAM.
The procedure was performed on a GT70 2OD-040US (Dragon Edition 2) laptop.
- However I see no reason why other GT70 2OD models wouldn't be the same or similar.
As always please observe the usual safety precautions before starting on a project like this.
Remember EMI KILLS electronics, so please make sure you've grounded yourself before opening the laptop.
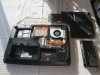
STEP 1.
(Let's get everything togther)
This is a fairly simple project and you won't need a lot of tools:
1. "Small" standard flat-head screwdriver.
2. Phillips head screwdriver (magnetic tip helps a lot!).
3. Small amount of clear tape (scotch tape is fine) - I'll explain this later.
4. Thermal paste (your choice of preferred brand).
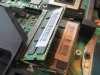
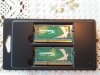
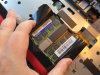
5. New Memory modules (in my case, I installed 4x8GB Kingston HyperX - P/N: KHX16LS9P1K2/16)
6. Your GT70

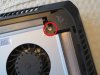
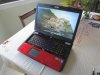
STEP 2.
(Time to open things up!)
First things first, let's do this by the book:
1. Make sure your laptop is disconnected from any source of wall power.
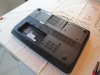
2. Turn the laptop over so the bottom is now facing you.
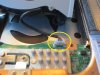
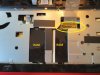
3. Remove the battery.
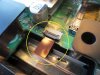
4. Remove the 7 screws (indicated by red circles in photo).
5. Gently pry up the access cover. Take care as to not break any of the nibs around the outer edge that help keep the cover in place.

STEP 3.
(Which came first? - Memory replacement or thermal paste...)
For those of you who want to simply replace the stock memory modules with something else, and that's it.....well you're a bit out of luck!
The problem is that the GT70 2OD has a new heat pipe section that runs from the GPU to the CPU.
This little addition just so happens to cross directly over one corner of the 2 memory modules on this side of the laptop (yes I did just say "this" side of the laptop - there's another two modules on the other side of the main board, but we'll get to that a bit later).
This makes removing the stock memory rather difficult without removing the heat pipe and associated heat-sinks first.
-
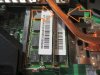
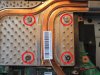
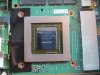
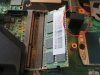
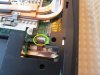
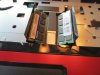
STEP 4.
(A quick overview)
This is an overview shot of where we'll be working (for the next few steps anyway)
The photo shows various screws that need to be removed (red) and data/power cables that need to be detached (yellow)
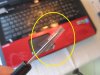
STEP 5.
(Fan removal)
Removing the blower fan is easy
1. Remove the upper corner screw.
2. Disconnect the fans power cable
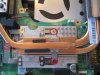
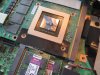
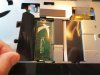
STEP 6.
(Off the heat-sink's go!)
CPU and GPU heat-sink removal
1. Remove the 4 screws holding the GPU heat-sink down.
2. Remove the three screws holding the CPU heat-sink down.
3. Gently remove each heat-sink (the thermal grease is soft so it lets go easily, but do be careful with any loose TIM pads (white colour) while removing each heat-sink).
-
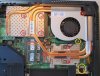
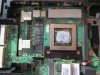
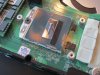
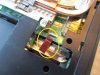
STEP 7.
(Cleanup and re-apply)
Both the CPU/GPU and their associated heat-sinks need to be cleaned up and re-pasted
1. Remove the old thermal paste (lint free cloth and isopropyl alcohol work well for this).
2. Re-apply any TIM pads that might have come loose in the previous step.
3. Apply new thermal grease directly to the CPU and GPU. Remember you don't need a lot here. Less is generally considered more!.
-
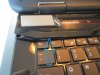
STEP 8.
(Replacing memory modules)
Before re-attaching the heat-sinks and fan, we need to replace the memory modules
1. Unlatch the old memory modules (starting with the top one) and slide it out from the pin connector.
2. Do the same for the bottom memory module
3. Install the new kit of memory - Please observe the direction the module faces by the notch along the pins.
STEP 9.
(Put it all back togther...)
With the new memory installed and thermal paste applied to the CPU/GPU, it's time to put it all back togther.
1. Check that the memory modules are well seated and latched into place.
2. Put back both heat-sink's, blower fan, and make sure they are well screwed down (don't forget the fans power connector!).
STEP 10.
(WAIT!....one little thing...)
Before working on the top side of the laptop, there's a small cable that needs to be detached from the bottom.
This is the LED light cable for the keyboard and it needs to be detached first before you can remove the keyboard (remember I said there's more memory modules on the other side of the motherboard?).
-
STEP 11.
(Topside! - Let's get the keyboard off!)
There's two additional memory modules on the opposite side of the main board and the only way to get at them is to remove the keyboard.
1. Remember the tape? Well take a bit of it and put it on the end of the flat-head screwdriver (this is to help prevent scratching the glossy surfaces of the laptop). I find 2-3 layers is good.
2. Using the screwdriver, insert it into one of the little notches on the touch panel - above the keyboard. Gently pry the panel up working along the length of the panel as each section pops up. Patients is a virtue here. The plastic panel is fragile so take your time and be careful not to scratch or break it!
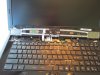
3. With the touch panel flipped up and out of the way, there's 4 screws holding the keyboard in place - go ahead and remove them.
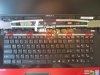
4. With the screws removed, slide the keyboard back and out of the way (CAUTION: there are two cables to watch out for - The main keyboard ribbon cable and the smaller LED cable we detached earlier. Be sure not to damage either one!).
-
STEP 12.
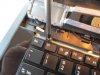
(OK? Where's the memory?)
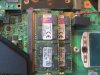
Yes the last two sticks of memory are there... Just a little hidden.
1.The memory modules are hidden behind the two long black covers under where the keboard was. Open each flap up and you'll see the memory.
2. Remove and replace each memory module as you did on the bottom side of the board. Only difference here is that one stick will face one direction and the other the opposite direction. Just make sure to line up the notches and you'll be fine!
STEP 13.
(Put the keyboard back together...)
New memory is installed topside, so let's put the keyboard back in place.
1. Gently slide the keyboard back in place making sure it's lined up properly, and do take care with those cables.
2. Tuck the small LED cable down the slot from which it came.
3. Screw down the keyboard.
4. Place the touch panel back in place. Gently press it back into place.
5. Flip the laptop over to expose the open bottom and re-attache the small LED light cable.
-
Really? There's no way to slide the ram stick under the heat sink in an angle and pop it in? The whole heat sink assembly has to be removed??
-
STEP 14.
(We're almost done!)
Now's the time to inspect your handy work and make sure everything is back together and in its place as should be.
1. Check that the fit and finish of your work looks top notch!
2.Be sure there are no loose screws or panels, and that everything that came out of you laptop, well- went back in! (Except for the old memory of course)
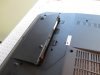
3. If all checks out, put the back cover on and screw it into place.
4. place the battery back in.
-
It sounds like all you need to do is pull the heatpipe off to change the RAM. If it's only connected by a few thermal pads you should be able to gently pull it off no problem and put it right back on!
-
I don't have the laptop myself (yet), but judging by the photo only, I find it difficult to believe that there isn't enough clearance to slide the ram stick under it (flat), then pop the ram stick right in. Can anyone else chime in here? Did you all have to remove the heat pipe / sink to add the ram? Builders? Ken??
Added: Just find it very, very difficult to believe that MSI would do that.. (requiring the user to remove the heat sink / pipe assembly to add ram). Perhaps you're right, since I don't have one yet, I wouldn't presume. But Just saying, I am baffled as to why MSI would do this (if indeed they did do that.. (making the user remove the heat-sink / pipe to add ram)). I guess I'll find out on Tuesday.... -
STEP 15.
(TA-DA!!)
Alright, it's that time to power on your GT70 and hope it doesn't blow up! (Just kidding... well sorta).
1. For now boot the laptop directly off the battery (assuming it's charged) and make sure it properly posts and boots into windows.
2. You may want to run a memory test program like memtest86, just to make sure your new Memory is stable.
3. Keep an eye on your CPU and GPU temperatures for the first little while, just to make sure your thermal paste job was a success.
4. Enjoy your new found performance with the faster memory, and maybe even cooler CPU/GPU temps?

TOTAL PROJECT TIME (START TO FINISH - INCLUDING TAKING PHOTO'S) = 1hr. -
A few screen captures...
-
*Phew* That's it.... I'm done!
...... (No honestly.....I'm done!)
-
Was thinking about getting an Alienware 17 for a while, untill recently the price dropped on the 2OD.
I mean:
MSI GT70 2OD
- 4700MQ
- 780M
- 16GB RAM
- 750GB HDD + 2x 128GB SSD
- Win 8
- 2 years warranty
2400
vs
Alienware 17
- 4700MQ
- 780M
- 16GB RAM
- 750GB HDD
- 2 years warranty + 2 years accidental damage warranty
- Win 8
2600 -
has anyone got the 4930mx in their gt70?
what speed can you overclock to?
are temps ok?
is it much faster than the 4900mq or does it get throttled due to the 180w psu.
thanks. -
Id like to know that too!
-
Fill me in why would it be throttled
-
Do you have a gaming laptop???
Combined Cpu wattage (at high clocks) & 780m wattage exceeds psu power so computer cuts outs or excess heat caushes cpu to throttle back. So extreme cpu waste of money if it can only be overclocked a small amount over a 4900mq.
Sent from my GT-I9300 using Tapatalk 2 -
I have gt70 2oc and a gateway fx p-171 s fx
Í am just new to over clocking a mobile -
Windows 8.1 Preview has NVIDIA Geforce driver 326.01.
Also exclusive to Windows 8.1 Preview is DirecrtX 11.2
DX11.2 is a new Direct3D feature called Tiled Resources, which exposes a limited virtual graphics memory model to apps. This prevents loose mapping between logical resource data and physical memory, and also allows the creation of large logical resources that utilize small amounts of physical memory. That's the technical description. Put another way, this will allow a game to store textures in both system RAM and graphics RAM. In real-world scenarios, this will come in handy for things like mapping out terrain in games and coding the user interface in apps.
In addition, Windows 8.1 Preview includes a new set of APIs for DirectX apps to present frames with lower latency, allowing for faster response time by the UI, -
How do you like it? Is it stable? As long as Office 2013 and games run as good as Win 8, I may go that route... -
I had a lot of issues with 8.0 so I mostly stopped using it a few months ago.I started with the Preview 8.0,then RC,RTM and Final.So I gave it a good try.
So far 8.1 has been issue free for me on my MSI but I am well aware it's a Preview.
A few options are accessed by right clicking on the taskbar>properties>navigation like booting directly to the Desktop and changing from powershell(admin) to command prompt(admin) when the start button is right clicked.
You also have the Shut Down,Restart and Sleep options when right clicking on the Start button.
IMO,it's better than 8.0
If you use IE as your browser,IE11 is included in the 8.1 Preview. -
What do you guys have to say about this? $1269 to good to be true (though he has a good feedback)... MSI 937 176322 001 NB BB HASWELLI7 GTX780M 17 3 No OS MSI 937 176322 001 | eBay
-
Pretty sure that's with no CPU, RAM, Storage, OS, etc, which explains the price.
-
That's $370 less than an MSI MS-1763 Whitebook barebones from GenTechPC
Gaming Laptops - GenTech PC - Gaming Notebooks - Custom Laptops - Custom Notebooks - Customize System
If the price seems too good to be true....it probably is. -
Meh, I'm still not feeling compelled to fool with the Preview. We'll see Final soon enough, and new NVidia drivers any day now. I can wait.....
The Official MSI GT70-2OD Owner's Lounge
Discussion in 'MSI Reviews & Owners' Lounges' started by -=$tR|k3r=-, May 13, 2013.


