Arthedes the only reason you pay VAT is because you live in the same state as Newegg's location. If you shipped to a non Newegg state (for example New York) or a state with no VAT then you would not need to add that tax
-
Yeah... we like to try to forget about those for most of the year...Jbgolf52 likes this.
-
Actually there are 4 states that pay tax, including sadly, NJ

-
Within US, only 4 States needs to pay tax, if you are shipping to EU you are automatically getting around tax. My buddy lives in Leuven (works at the university, great university there btw!).
-
Hmm some import calculator told me I still needed to pay 21% to customs.
I study at that university! -
It depends on the country you live in. For example if I import a $2000 laptop from the US to Sweden I get slapped with 25% VAT on purchase+transport+insurance (apparently no customs fee).
Incidentally that adds up to almost exactly the cost at the local resellers. Yay.pranktank likes this. -
Is anyone's notebook check being weird and saying there are 146 pages on this thead but will not go past 137, even when you click last or manually enter a higher page number?
-
Yeah I'm seeing that all over the forums too.
-
Their pagination generator is broken.
-
Hey guys...
Didn't know if you could help me out.
Everyone here probably knows a lot about Gigabyte and it is a little quite over at the Auros X7 Pro forum.
According to some people the Auros X7 Pro does not throttle at all and that the fans are extremely powerful.
Can anyone give me a quick comparison of the Auros X7 Pro vs P35x V3. Why you would buy either one over the other?
Would be greatly appreciated. -
Hopefully you meant 246 and 237 or I have more problems here than I thought
-
Oops yeah I did lol
-
I dont pay vat in murica at all. I pay 21% vat when it arrives in the netherlands.
Sent from my GT-I9300 -
How do i avoid tax? The laptop is only 2000 euros if I buy dollars and give them to hidevolution.
Sent from my GT-I9300 -
I'm pretty certain my fellow Americans are confusing U.S. state sales tax with the European Value Added Tax, which is a totally different form of taxation. You won't be charged US sales tax, since you don't live in one of the four states in which Newegg has a physical operation. However, the only way you are getting the computer into your country without paying the Value Added Tax/import duties is by avoiding it going through customs. And while I'm sure that may be possible (though not with Newegg's cooperation!), I'm pretty sure the VAT you would be saving is nothing compared to what would happen to you if you got caught trying to go around customs!
Edited to add:
I noticed this too. I also noticed that I wasn't seeing entire pages of irrelevant posts from a certain "prolific" poster in all of my subbed threads. So I went back searching for some of his old posts.... and *poof* they are all gone. The only evidence I can find of his existence is all of his posts being quoted in exasperated replies. Looks like someone went down the memory hole! I bet this has something to do with all of the missing pages. The system will likely auto-clean this at some point and fix the page numbers.
Last edited: Dec 29, 2014 -
Looks like pagination has been fixed.
-
Best way is to have a relative/friend bringing it back to you. It may only be somebody temporarily in the us; but shipping it will systematically go through the customs and vat will be added.Arthedes likes this.
-
Yupp, definitely you will end up paying VAT if you are living in Europe and the goods are passing through border. Same if we buy something from outside of US and at border, US charges me 8% at the border for tax.
-
After we had fun with taxes (aha ...) back to a technical question.
Using an SSD instead of an HDD - how does it usually impact temperatures ? average SSD creates more heat than an average HDD ? -
SSD is the best computer upgrade you can have, trust me. It doesn't create significant heat to begin with, but also eliminates the spinning sound of a regular HDD.
-
Which is awesome, especially on this laptop. In regular computer work, the only source of noise was hdd; now with ssd everything is silent
-
If I were to use an ssd for windows and most often used programs/games and an hdd for media, will the hdd always be spinning when the computer is on? I presume it will?
-
I know I have a different laptop, but I notice that mine spins down when not being used for a long time - there might be a setting for it in Windows Power Options, or maybe it's part of the BIOS perhaps.pranktank likes this.
-
It will spin when you access it, otherwise it should be silent (though pretty sure it won't be like this all the time).
BTW Jean, you did liquid ultra for paste right? my cpu fans are pretty much always active (especially download, or 60fps youtube), maybe I should use liquid ultra as well?
pranktank likes this. -
I think it depends on your fan mode, I am on stealth, and in this mode they spin maybe 20 seconds every 5 minutes. What are your idle cpu/gpu temps? I do have liquid ultra.
I think I reached kind of a limit on undervolting, Dynamic Voltage at -75mV, I have BSOD going lower. I am also at -75mV on Cache Voltage, I do not know if it is worth going lower...
Shadow of Mordor: No throttling seen, Ultra settings, 1080p, several missions (and death=retry, the downward peaks in cpu temps). The game is super smooth and looks great.
FPS

CPU TEMP (I lost gpu temps...)

CPU and GPU clocks (no throttling, steady curves hovering between max multipliers)
 hijinks likes this.
 -
All right people, time for the repasting kind of guide:
First of all, I would say that I am no expert; this is my first laptop repaste, I had only one desktop repaste experience before, so you see it is not very hard to do
Very useful videos to watch:
https://www.youtube.com/watch?v=qFhbqiFh9Us
https://www.youtube.com/watch?v=Lbn3PMfogzk
What you will need:
-A screwdriver (I used a thin one for electronics with flat and cross like tips)
-Paper towels
-IsoPropylAlcohol (further named IPA)
-Cotton swabs (I used them for spreading the paste and cleaning: I think it is not the best technique as some cotton particles can stick in the paste).
-Some cups to keed the different kinds of screws (three)
First, find a good surface to work on, where you will have enough space to spread your tools and laptop around.
For a repaste, you will need to detach the heatsink from the dies; one tip is to do so when both are still warm. So before operating, give your computer a good sweat, and what better than this than play a very good demanding game for one hour?
Let's go on! Unscrew the bottom of the laptop, here is a list of the different screw sizes:
7mm: 2, 3, 4, 5, 12, 13
5mm: 6, 7, 14, 15
4mm: 1, 8, 9, 10, 11
Once this is done, DO NOT PULL ON THE BOTTOM OF THE LAPTOP. There are two wires connecting the motherboard to the chassis, the one of the front speaker and the one of the bottom speaker. Remove the ram panel to access the bottom speaker wire connection, and deconnect it.
Once this is done, you can put the bottom of the laptop aside if you have enough room, as the remaining wire is on one of the laptop side. If like me you do not have enough room and prefer to dismantle the whole thing (like me ^^) deconnect this one too:
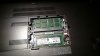
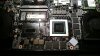
Now you can access the beautiful but not always performing black heatsink. Unscrew the circled screws. As you will see, they are mounted with a spring and cannot be removed, let them where they are.
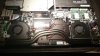
Once all the screws are untighten, grab the heatsink by one of the radiator, next to the fans, and make it move gently, with small wiggles. It should move more and more and you should be able to detach it from the dies. DO NOT TOUCH ANY PART OF THE THERMAL SIDE WITH YOUR FINGERS! Especially not the gum like colored square, that are here to connect heat transfer with some of the on-die MOSFET. Put the heatsink with the thermal pads facing up. You can see how good the factory paste job is:
-
--- Not enough picture on previous post, tutorial continued here---
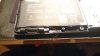
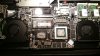
Now we have to clean this mess. Start with any of the two component. Always begin with dry cleaning: for the heatsink, you can direcctly use paper towels to wipe the factory paste, eventually using cotton swabs to try to remove the paste. For the dies (the cpu and gpu), I only use cotton swabs. Be careful not to touch too much the other components, try only to wipe the surface of the dies. Once you are satisfied with the dry cleaning, use some IPA to remove the remaining paste. I had some IPA wet towels included in my Liquid Pro pack: I wet cotton swabs with them, and used it to clean every thing up. For the heatsiink, you should try to brush in the same direction as the copper lines you can see. For the dies, try not to put IPA all over the place. A good rule of thum to know when you are done, is to take a clean cotton swab and to brush it against the surface you want to test: if the tip is not perfectly clean afterwards, there is still some paste remaining.
Now you are ready to apply your new thermal paste. I did choose the Liquid Pro because I was curious about it. I also had a tube of Gelid extreme, but chose to go with the liquid. Be aware, the application of the liquid is far longer than traditional paste, and I am not sure that it would be easily removable if you want to change paste. To avoid any spill inside the laptop, I was pressing the syringe over a small cup to recover wastes and not to spill them in my room; if you do not do so, THIS could happen:
https://www.youtube.com/watch?v=ihI49J0Qjo0
This procedure has proven efficient: I pressed the syringe outside of the laptop, and only kept a small blob hanging at the tip of the needle. Then I cautiously brought this tip on the die I was treating. Once the blob is on the die, I spreaded it with my cotton swab, with patience, paying attention not to drop liquid outside of the die. Repeat this procedure until you reach the "mirror state" they are talking about in the manual and video in previous post. The following image shows the result, but I did not apply enough paste this time; I had to reopen the laptop and to add a bit of paste, the results in temps being worst than before

But remenber that with thermal paste you should never put too much paste, especially with this one that can spill in your laptop!!! So use caution and your head.
And now you are quite done! Replace the heatsink cautiously. !!! Warning, there are two small plastic sheets that goes from the rads under the fan holes, probably to guide air; make sure these sheets go correctly to their place!! Then press gently the heatsink to the motherboard, and tighten the screws not one by one, but more all at the same time: tighten them a bit one by one, and going so secure them, to reduce the stresses applied to the motherboard (see repasting video of previous post for more details).
Then put the bottom of the laptop back in place, reconnect the speaker wires, and, with the same all-at-the-same-time fashion tighten the screws.
You are done!
Fun fact: by playing with screw number 10, you can see the "F" stroke going up and down... Clear flaw of the keyboard here, thinking of a mod to fix this. -
Thank you for the guide! Just on the off-chance, did you measure how thick the thermal pads are just in case someone wants to replace them with Fujipoly thermal pads? So far there's no evidence that those pads need to be replaced, but I think I have some Fujipoly pads left over from installing a waterblock, so if I repaste with Liquid Ultra, I might as well...
-
I did not measure them... But they are 1-2mm thick from what I recall
hijinks likes this. -
Jean, awesome job mate! Is it possible if you can pull all of this into a separate thread? Would be easier to access and give you a LOT of reputation! (will rep you as soon as I can as well)
-
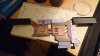
Leveled out the keyboard. Not perfect, but much better. f key is a bit low still, but enter button area isn't as sunk in.
Used a single washer under the f and enter screws, between the bottom case and the mother board. I also replaced all 4 keyboard screws with slightly longer ones. If you want to attempt this, make sure all bottom screws are tightened after you insert the washers. Afterwards, try different combinations of the screw lengths and see how it levels out. You will need to find a happy medium between flex and fix. I have slighty more flex on the numpad, but that's it. I don't know why only the numpad, but rest feel nice and tight.Attached Files:
-
-
Jeanjackstyle those were some quality posts. +rep
Regarding power throttling, did anyone measure how often the PSU is maxed?
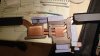
If it's often there might be a fix: the (gigabyte) aorus x7 pro uses a 200W psu and looks like it has the same plug as the p35x. These 20W could make a difference and leave a little headroom for an overclock on the gpu.
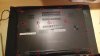
Can one of the owners see if it's indeed the same plug?:Attached Files:
Arthedes likes this. -
-
Thank you, it is not that much!
Your tip for the adapter should help a lot for OC! As regards CPU power throttling, I think it is not the PSU that limits it, more the settings to shift in XTU...
Quick question: I put 1866MHz in my laptop, and I see this in HWmonitor:
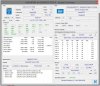
The displayed speed is 930 MHz, is it normal? -
If I'm not mistaken it's normal because DDR3=Double Data Rate 3, so you should multiply it by 2. 2x931=1862~1866.
-
A note regarding that Log Viewer: When I tested the P35X i found the Viewer is pulling the clocks for the integrated gpu no matter what you choose in the drop-down. I saw the exact same core Clock fixed at 1197 MHz. How often is the dGpu fixed like that and have you even oc:d it to that level? I had to use gpu-z to properly log the gpu core Clock.
-
You got a point; this flat line was bugging me! I will try with gpuz this after noon, I did not oc'd yet, wondering if it is worth it seeing the thermal space here. Did anybody try to oc the cpu on this laptop?
-
Cakefish did, as did sparkle999 I think. It would be interesting to see how much hotter it makes the cpu and how far it can go, how much it improves performance (and if it's worth the extra heat/potentially lower clocked cpu) and whether the 180W psu is sufficient.
I read that the locked vbios limits the core OC to +135, which I think should not be a problem to achieve. It might also be worthwile playing with an undervolt on the gpu side. -
I didn´t oc the cpu, I never undervolted and I had trouble cooling the cpu at stock. The gpu however ran +135/+500 MHz no problem.
-
Yes sparkle999 optimum was +135/750 for GPU. But I was wondering about cpu? I tried, and it power throttles. Since I do not know really well what is is, I am a bit puzzled here. Maybe I can tweak the different pl1 and pl2 values?
I am thinking about oc the cpu only for cpu intensive tasks, such as photo/video editing and computing. For gaming I will let it stock, and maybe oc the GPU. -
Anyone have any experience with the cooling for the Gigabyte P35X V3-CF4?
-
Do you mean as upposed to the CF2, CF3 etc.?
-
Has anyone actually seen a cf3? I've seen 1 2 4 5 but no three.
-
Its kinda impossible to compare cooling of different versions unless someone buys both applies the exact same paste job and then benches them in the same room / environment. But aside from that, I feel like the cooling on CF4 is borderline adequate. With -60mV undervolting and a laptop cooling pad, you do not experience temperature throttling. Even without both, I never experienced stutters. Though definitely, an epsilon better cooling design, like another heat pipe, would have been a milestone on this laptop, let's hope next iteration will include:
1) third heat pipe.
2) better keyboard, please partner with SteelSeries, I am willing to pay 50-100 dollars extra for this.
3) glass borders around screen instead of plastic.
With these, it would have been an amazing machine (still a solid laptop atm imho though)
Arthedes likes this. -
Damn it we should learn if this is possible, I will give Gigabyte a call today or tomorrow!
jiexi likes this. -
Unless someone answers it before then, i can see tonight if they physically plug in/work. My brother has the Aorus. I won't have time to do a bunch of testing to see if it makes any difference but I can confirm it at least boots and charges.maxheap likes this.
-
^^ Just let us know if they are compatible and laptop can power on with it (also if you can run a full FireStrike, we would appreciate!)
-
Happy new year guys. May your temperatures be low and your framerates high!
-
Nice, do not install FD08 BIOS EC, cannot boot anymore with it...
-
I installed it, no issues so far... How did you install it?
***Gigabyte P35X owner's lounge***
Discussion in 'Gigabyte and Aorus' started by Cakefish, Nov 4, 2014.


![20141230_225802[1].jpg](images/storyImages/_20141230_225802-1.jpg)
![20141230_225749[1].jpg](images/storyImages/_20141230_225749-1.jpg)